- What does Android push token and hwid look like?
- How can I obtain my Android device push token?
- How to locate my Google Project Number?
- What permissions are necessary and what are optional?
- How accurate is the total number of Android subscribers?
- Can I use HTML tags in pushes sent to Android?
- How to set notification icon in Android Lollipop?
- Using Local Notifications with Pushwoosh
- Using Custom Push Service in Android
- Using Custom Push Broadcast Receiver in Android
You should open the ddms.bat file located in C:\Users\%Username%\AppData\Local\Android\sdk\tools\ddms.bat, connect your device to the PC and allow USB debugging in the Android settings. Then run your application on the device. Locate the /registerDevice Pushwoosh call, and there you will see the push token for your device, which you can later use in Test Devices.

Please note that you can simply launch this file from its location without launching the Android Studio itself. - - - - - -
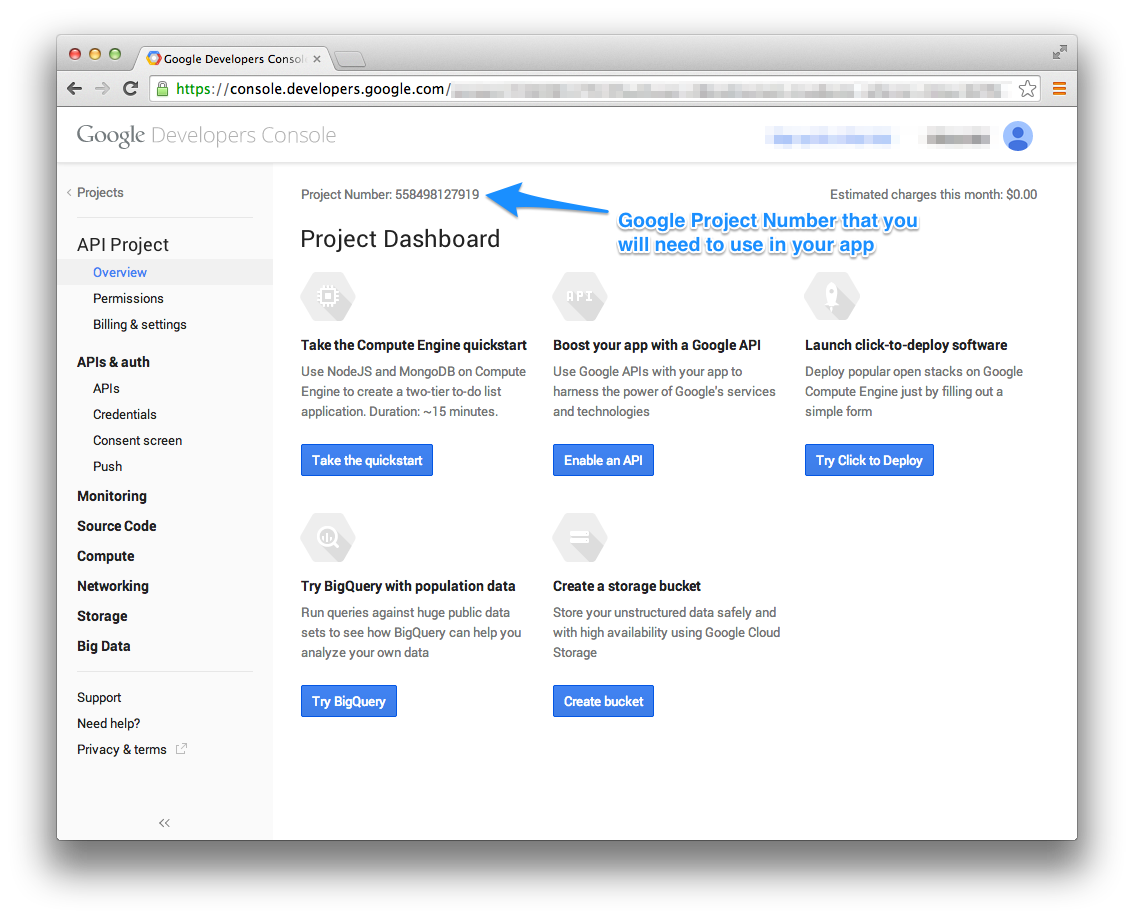
Here, 558498127919 is the Project Number you enter in the app. Don’t confuse it with Project ID, which is a completely different identifier & is used only within Google Developers Console! Even though GCM Project Number is a number, make sure you prefix it with the letter “A” when integrating the following Android SDKs into your project: Native, Unity, Marmalade, Adobe AIR and Xamarin.
Here’s the most common scenario described in the GCM documentation:
- Your subscriber uninstalls the app.
- Pushwoosh sends a message to GCM server.
- The GCM server sends the message to your user’s device.
- The GCM client on the device receives the message and detects that your application has been uninstalled; the detection details depend on the platform on which the app is running.
- The GCM client on the device informs the GCM server that the app was uninstalled.
- The GCM server marks the registration ID for deletion.
- Pushwoosh sends another message to GCM.
- The GCM returns a NotRegistered error message.
- Pushwoosh removes the push token from your userbase.
Note that it might take a while for the registration ID be completely removed from GCM. Thus it is possible that messages sent during step 7 above gets a valid message ID as response, even though the message will not be delivered to the client app.- - - - - -
The system ignores all non-alpha channels in action icons and in the main notification icon. You should assume that these icons will be alpha-only. The system draws notification icons in white and action icons in dark gray. This is beyond Pushwoosh SDK control.
However, you can revert this behavior to use old style colored icons:1. Set targetSdkVersion to 19. This automatically brings the old behavior back.
OR
2. Create the notification icon according to the Android guidelines. As per documentation, the system will ignore all the colors.
2.1. Name the icon as pw_notification.png and put it in res/drawable folder. Pushwoosh SDK will use this icon as default for notifications.
2.2. Alternatively, you can use Remote API and set the "android_icon" parameter value to the icon image (without file extension).
<application> tag:
Ex.: In your manifest you have to substitute the
with
Example of the receiver (note pre- and post-handling functions): public class NotificationReceiver extends BroadcastReceiver { public void onReceive(Context context, Intent intent) { if (intent == null) return; //Let Pushwoosh SDK to pre-handling push (Pushwoosh track stats, opens rich pages, etc.). //It will return Bundle with a push notification data Bundle pushBundle = PushManager.preHandlePush(context, intent); if(pushBundle == null) return; //get push bundle as JSON object JSONObject dataObject = PushManager.bundleToJSON(pushBundle); //Get default launcher intent for clarity Intent launchIntent = context.getPackageManager().getLaunchIntentForPackage(context.getPackageName()); launchIntent.addCategory("android.intent.category.LAUNCHER"); launchIntent.setFlags(Intent.FLAG_ACTIVITY_NEW_TASK | Intent.FLAG_ACTIVITY_RESET_TASK_IF_NEEDED); //Put push notifications payload in Intent launchIntent.putExtras(pushBundle); launchIntent.putExtra(PushManager.PUSH_RECEIVE_EVENT, dataObject.toString()); //Start activity! context.startActivity(launchIntent); //Let Pushwoosh SDK post-handle push (track stats, etc.) PushManager.postHandlePush(context, intent); } }