May के और updates आ चुके हैं — जैसा हमने vol.1 में promise किया था।
यह रहा क्या-क्या change हो रहा है 👇
Email subscription categories का management काफ़ी आसान हो गया 📩
Q1 में हमने एक serious email upgrade ship किया था, जिसमें subscription preference center भी आया — ताकि subscribers एक ही unsubscribe button दबाने के बजाय Newsletter, Promotional, या Product Updates जैसी categories अलग-अलग pick कर सकें। भारतीय teams के लिए ये practical बात है: India में audience से DPDP Act के तहत consent लेना अब expectation है, और global users (US, UK, EU) के लिए GDPR/CAN-SPAM compliance भी matter करता है। Granular category-level consent एक blanket unsubscribe से कहीं ज़्यादा health बचाता है आपकी list की। इस महीने दो operational improvements इन categories का management काफ़ी lighter बना देती हैं।
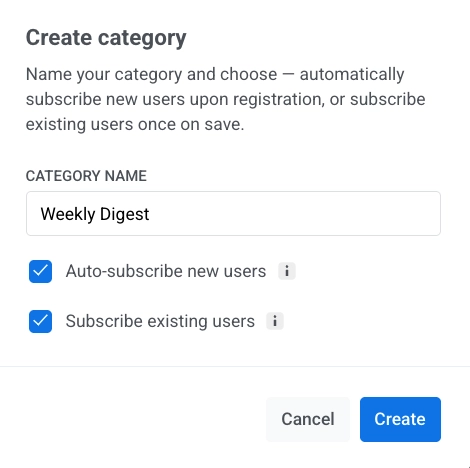
✅ Category save करते ही users को auto-subscribe कीजिए
जब आप preference center में नई category add करते हैं, अब आप दो toggles on कर सकते हैं: Auto-subscribe new users (इस point के बाद register करने वाले हर user को subscribe कर देता है) और Subscribe existing users (save करने पर current base को subscribe कर देता है)।
क्या change होता है: पहले नई category बनाने का मतलब था एक follow-up step — एक tag update या एक import — और तभी जाकर कोई actually उसमें होता था। अब दोनों चीज़ें सीधे category settings से ही हो जाती हैं।
Compliance के नज़रिए से एक important point: ये दोनों toggles ये assume करते हैं कि affected users पहले से valid marketing consent रखते हैं। मतलब ये opt-in को replace नहीं कर रहा है — एक existing consent को साफ़-साफ़ named new category में organize कर रहा है, और सब कुछ आपके account के audit log में record रहता है।
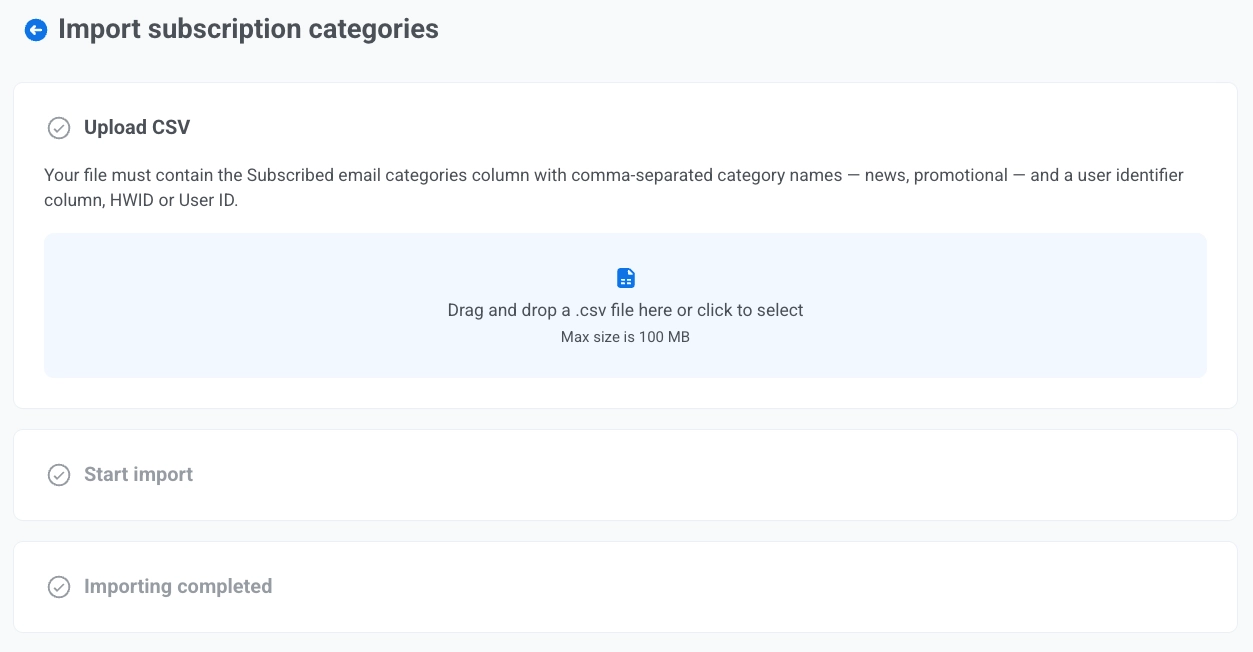
📥 Subscription categories CSV से import कीजिए
अब आप Subscribed Email Categories tag को एक CSV file से bulk-update कर सकते हैं।
क्या change होता है: दूसरे platform से preference data migrate करना (या किसी बड़े chunk of users पर one-time correction apply करना) अब custom import flow या developer ticket नहीं माँगता। ख़ासकर जब team WebEngage, MoEngage, Netcore, या Mailmodo जैसे setups से Pushwoosh पर move हो रही हो, ये recurring effort काफ़ी बचाता है।
CSV processing पूरी तरह Pushwoosh platform पर होती है — SOC 2 Type I, ISO 27001:2022, GDPR-compliant, EU/US data centers के option के साथ। यानी आपके subscribers का preference data compliance boundary के अंदर ही रहता है।
Journey के हर step पर email subject और sender override कीजिए ✉️
Customer Journey Builder के Email element में अब आप underlying email preset को छेड़े बिना seedhe step पर subject line और sender details set कर सकते हैं।
हर Email step के लिए choose कीजिए:
Subject line — Custom (इस step पर apply होने वाला subject type करें) या From preset (preset का subject use करें, और अगर बाद में preset update हुआ तो auto-sync हो जाएगा)।

Sender info — Specify manually (सिर्फ़ इस step के लिए From Email, From Name, और optionally एक reply-to address set करें) या From preset (inherit और auto-sync)।

क्या change होता है: एक step के लिए subject या sender swap करने के लिए अब पूरा preset clone करने की ज़रूरत नहीं। दो Email elements के पहले एक A/B/n split डाल दीजिए, हर एक को अलग custom subject दीजिए — subject-line A/B test चल पड़ा। Replies को सही team पर route कीजिए — एक step पर support@company.com, दूसरे पर vip@company.com — बिना content duplicate किए।
भारत के multi-brand setups के लिए particularly useful: एक ही Journey के अंदर अलग-अलग BUs (D2C brand और marketplace, या city-specific operations) के लिए अलग reply-to addresses route कर सकते हैं — हर brand के लिए अलग preset maintain करने के बजाय।
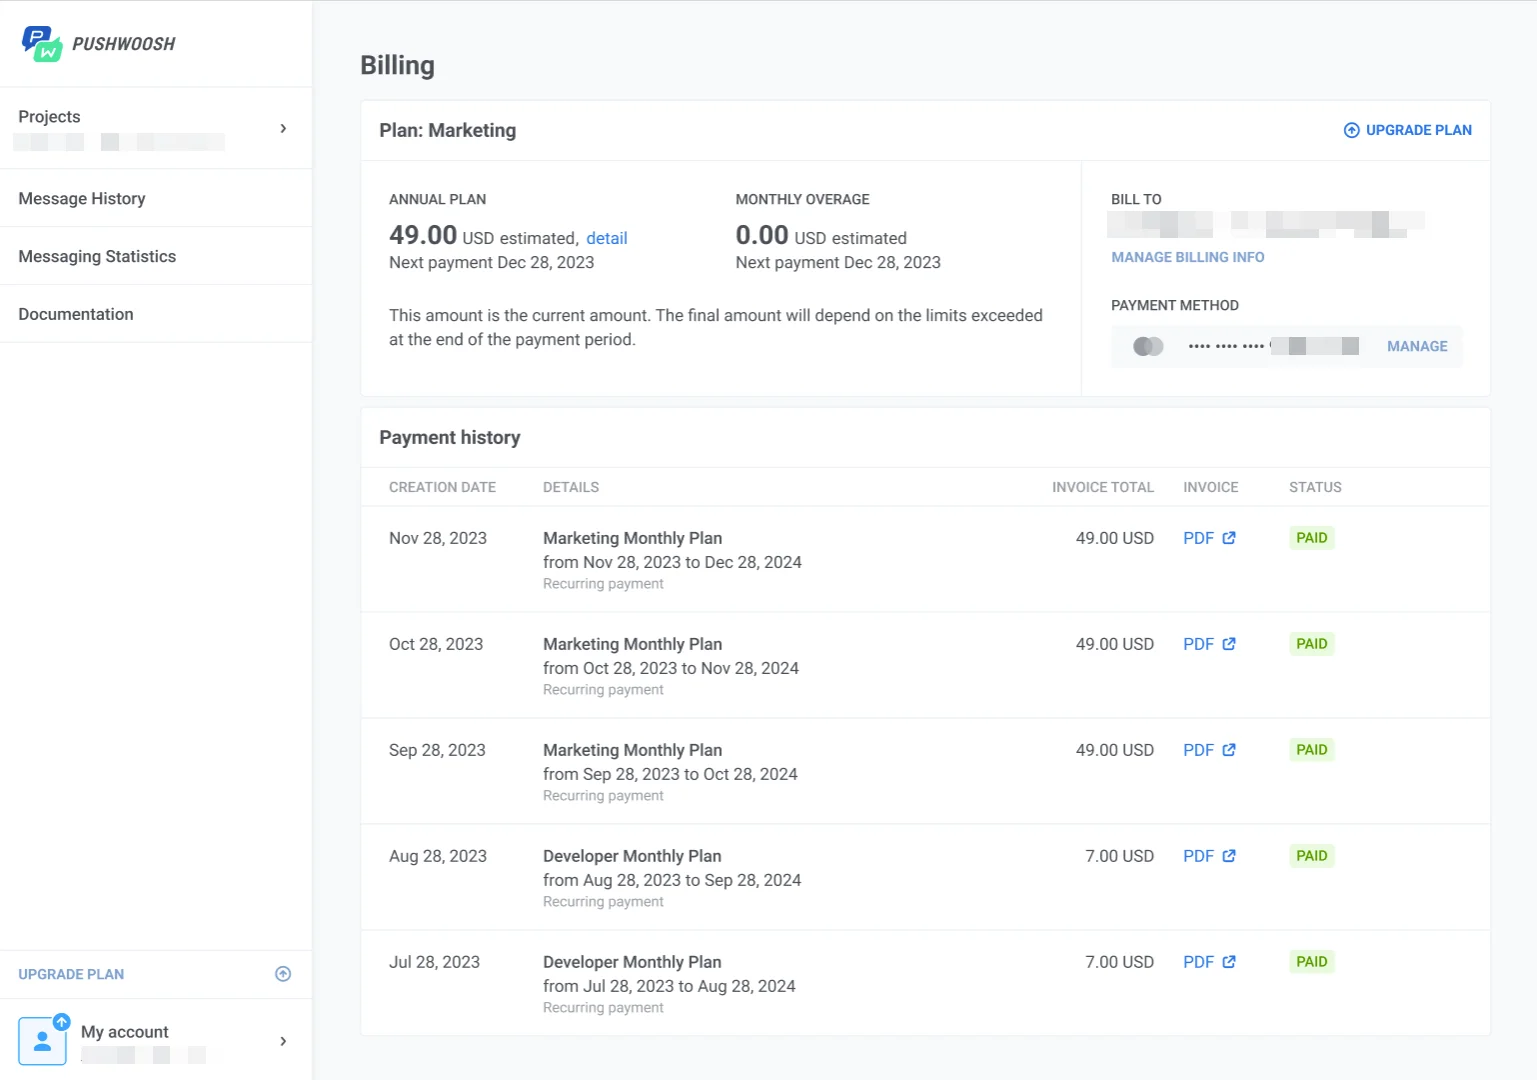
Billing-related सब कुछ एक ही जगह 💳
Billing page को redesign कर दिया गया है। Plan details, usage, invoices, payment methods, और ManyMoney AI की daily request usage — सब अब एक ही page पर My account → Billing के under live हैं।
क्या change होता है: Plan limit check करने, invoice download करने, या card update करने के लिए अब अलग-अलग screens के बीच क्लिक नहीं करना पड़ेगा। Billing खोलिए, और पूरी picture वहीं है:
- Overview — plan name, billing cycle, अगली payment date, period का estimated total, billing contact, plan limits के against MAU व email send usage, plus ManyMoney AI की daily request usage और reset time (अब हर plan में free available है 😎)।
- Invoices — billing history with PDF download हर period के लिए (Indian GST invoicing और global USD billing — दोनों एक ही जगह से track होते हैं)।
- Payment methods — cards और PayPal, default clearly marked।
Updates ख़ुद try कीजिए
ऊपर बताया गया हर feature live है और आपके account में अभी use करने के लिए ready है।
हाल ही में ship हुए सभी updates की पूरी list के लिए हमारी release notes देखिए।
संबंधित लेख
सभी देखें