ग्लोबल मोबाइल मार्केट के 80% से ज़्यादा हिस्से पर एंड्रॉइड का कब्ज़ा है, इसलिए एंड्रॉइड पुश नोटिफ़िकेशन यूज़र्स तक पहुँचने, उन्हें एंगेज करने और रिटेन करने के सबसे प्रभावी तरीकों में से एक बने हुए हैं। यह गाइड वो सब कुछ कवर करती है जो marketers और app teams को जानना चाहिए: एंड्रॉइड पुश नोटिफ़िकेशन क्या हैं, छह मुख्य प्रकार, सेटअप कैसे काम करता है, हाल के permission changes, और वो best practices जो ऑप्ट-इन रेट्स और कैम्पेन परफ़ॉर्मेंस को बेहतर बनाती हैं।
एंड्रॉइड पुश नोटिफ़िकेशन क्या हैं?
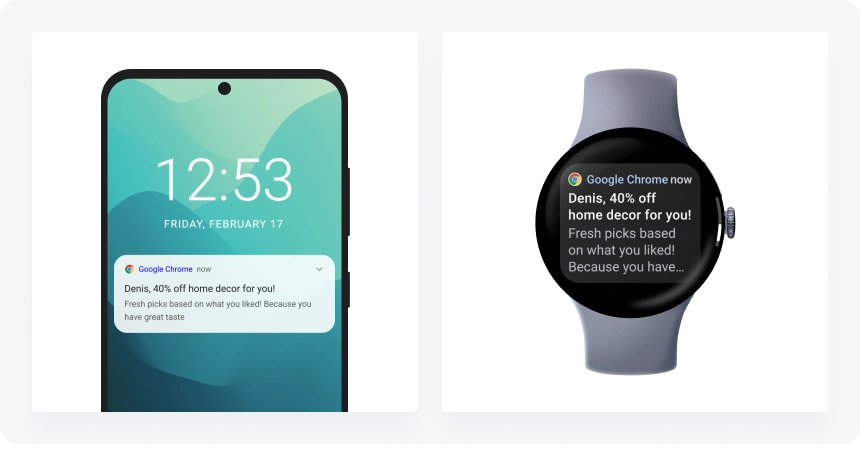
एंड्रॉइड पुश नोटिफ़िकेशन छोटे, real-time messages हैं जो सीधे यूज़र के डिवाइस पर भेजे जाते हैं — ताकि उन्हें सूचित किया जा सके, याद दिलाया जा सके, या किसी action के लिए prompt किया जा सके — चाहे app ओपन हो या न हो। ये lock screen पर, notification tray में, या heads-up banner के रूप में दिखाई देते हैं, और Firebase Cloud Messaging (FCM) — Google की पुश नोटिफ़िकेशन सर्विस — के ज़रिए डिलीवर होते हैं।
सही notification strategy के साथ, पुश messages यूज़र engagement बढ़ा सकते हैं, retention को boost कर सकते हैं, और lifecycle के key moments पर यूज़र्स को reactivate करके conversions ला सकते हैं।
एंड्रॉइड पुश नोटिफ़िकेशन के प्रकार
एंड्रॉइड छह distinct notification types सपोर्ट करता है, हर एक अलग marketing और product use cases के लिए suited है। इन types को समझने से आपको हर message के लिए सही format चुनने और उसी हिसाब से notification channels को configure करने में मदद मिलती है।
1. Standard notifications
डिफ़ॉल्ट फ़ॉर्मेट: icon, title और body text की एक single line। Standard notifications का use ज़्यादातर रोज़मर्रा के messages के लिए होता है — order updates, reminders, account alerts। ये सभी एंड्रॉइड versions और OEM skins (Samsung One UI, Xiaomi MIUI, Huawei EMUI) में consistently render होते हैं।
2. Rich (expanded) notifications
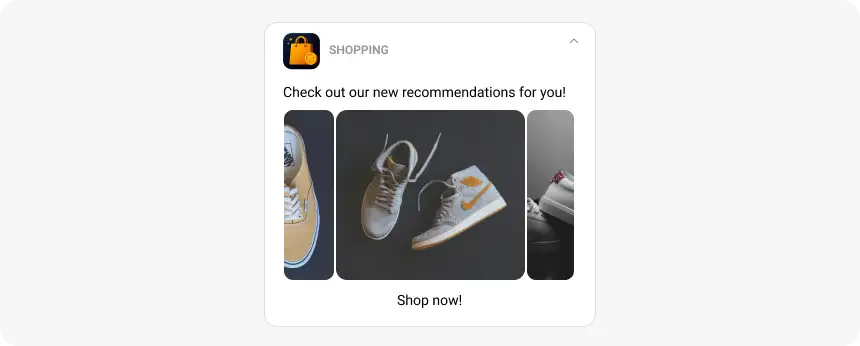
Rich पुश नोटिफ़िकेशन expand होकर एक बड़ी image, multi-line text block (BigTextStyle), या inbox-style list (InboxStyle) दिखाते हैं। एंड्रॉइड 10 MB तक की images और 50 MB तक के videos सपोर्ट करता है — iOS (2 MB) से काफ़ी ज़्यादा generous। Rich notifications का use product showcases, editorial previews, या किसी भी ऐसे message के लिए करें जहाँ visual context engagement drive करता हो।
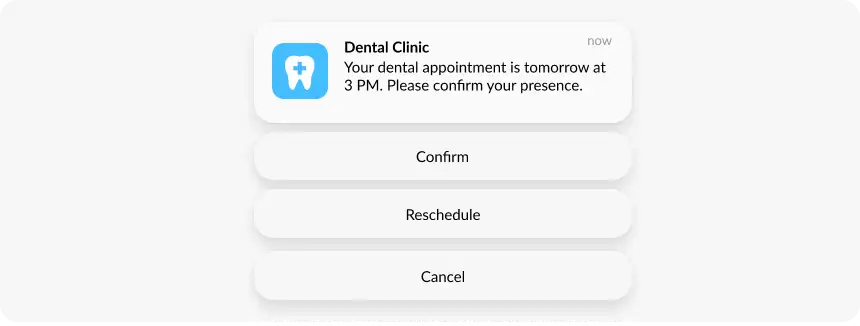
3. Interactive notifications (action buttons)
एंड्रॉइड एक single notification पर तीन action buttons तक allow करता है — जैसे “Shop Now”, “Track Order”, और “Dismiss”। किसी button को tap करने से app खोले बिना ही in-app action trigger हो जाता है। ये NotificationCompat.Action से बनाए जाते हैं और e-commerce तथा delivery apps के लिए सबसे highest-converting notification formats में से हैं।
4. Silent (data-only) notifications
Silent पुश नोटिफ़िकेशन यूज़र को कोई visible alert दिखाए बिना background में app को data payload deliver करते हैं। इनका use app content refresh करने, data sync करने, in-app events trigger करने, या user के local state को update करने के लिए होता है। एंड्रॉइड इन्हें visible notifications से अलग तरह से handle करता है: ये notification channels को bypass करते हैं और importance levels में नहीं गिने जाते।
5. Geofenced / location-triggered notifications
Location-triggered notifications तब fire होते हैं जब यूज़र किसी defined geographic boundary (geofence) में enter या exit करता है। आम use cases में retail stores के लिए proximity offers, delivery apps के लिए location-specific service alerts, और venue arrival से tied event reminders शामिल हैं। इनके लिए यूज़र से notification permission और location permission दोनों चाहिए।
6. Conversation और bubble notifications (एंड्रॉइड 11+)
एंड्रॉइड 11 में introduce हुए, conversation notifications person-to-person messaging apps के लिए एक dedicated display format हैं। ये notification shade के top पर अलग “Conversations” section में surface होते हैं और floating “Bubble” में promote किए जा सकते हैं — एक persistent overlay जो यूज़र के app में navigate करने पर भी visible रहता है। यह format एंड्रॉइड के लिए unique है और iOS में इसका कोई direct equivalent नहीं है।
एंड्रॉइड बनाम iOS पुश नोटिफ़िकेशन: मुख्य अंतर
दोनों platforms robust पुश नोटिफ़िकेशन systems offer करते हैं, लेकिन delivery, display, permission model, और media support में अलग हैं। इन differences को समझने से marketers को हर platform पर maximum reach के लिए campaigns tailor करने में मदद मिलती है।
| पहलू | एंड्रॉइड | iOS |
|---|---|---|
| Delivery system | Firebase Cloud Messaging (FCM) | Apple Push Notification service (APNs) |
| Opt-in model | एंड्रॉइड 13+ से explicit consent ज़रूरी; पहले automatic | सभी versions पर explicit opt-in ज़रूरी |
| Avg. opt-in rate | ~75% (Pushwoosh 2025 स्टडी) | ~56% (Pushwoosh 2025 स्टडी) |
| Avg. CTR | 2.75% | 1.71% |
| Rich media limits | Images 10 MB तक, video 50 MB तक | Images और GIFs 2 MB तक |
| Notification channels | Per-channel user-level control (एंड्रॉइड 8+) | iOS categories; priority system logic से |
| Grouping | App-wise auto-groups; customizable | Notification Summary + app-defined groups |
| Live updates | Live Updates API (एंड्रॉइड 16) | Live Activities (iOS 16+) |
| Conversation/Bubbles | हाँ (एंड्रॉइड 11+) | कोई equivalent नहीं |
मुख्य बातें: एंड्रॉइड broader reach और higher opt-in rates देता है; iOS slightly higher per-message engagement drive करता है। एंड्रॉइड के richer format options और larger media limits marketers को ज़्यादा creative latitude देते हैं — इनका फ़ायदा उठाएँ।
एंड्रॉइड पर पुश नोटिफ़िकेशन कैसे भेजें (सेटअप समझाया)
एंड्रॉइड पुश नोटिफ़िकेशन Firebase Cloud Messaging (FCM) के ज़रिए deliver होते हैं। यहाँ बताया गया है कि full delivery flow कैसे काम करता है, और पहला message भेजने से पहले आपको क्या configure करना होगा।
एंड्रॉइड पुश नोटिफ़िकेशन delivery कैसे काम करती है
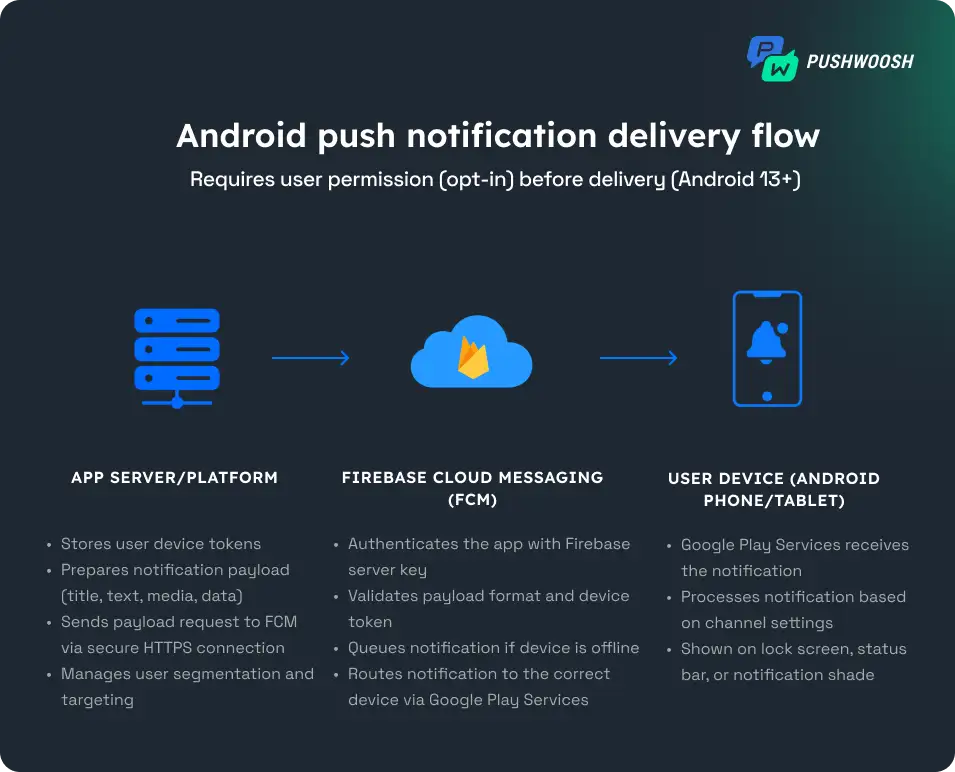
- यूज़र permission देता है — एंड्रॉइड 13+ से, app को POST_NOTIFICATIONS runtime permission request करनी होती है। यूज़र के opt-in के बिना कोई पुश messages deliver नहीं हो सकते।
- FCM token generate होता है — यूज़र के notifications allow करने पर, app FCM के साथ register होता है और एक unique registration token (FCM token) पाता है — उस app-device pair के लिए एक delivery address।
- Token app server पर stored होता है — आपका backend या engagement platform इन tokens को store करता है और notification payload बनाता है: एक JSON object जिसमें title, body, media और delivery parameters होते हैं।
- Payload FCM को भेजा जाता है — server authentication credentials के साथ payload FCM को भेजता है। FCM इसे validate करता है और delivery के लिए notification को queue करता है।
- Google Play Services के ज़रिए delivery — FCM device पर notification deliver करता है। यह importance level, notification channel, और device settings के हिसाब से lock screen, status bar, या heads-up alert के रूप में appear होता है।
Technical setup checklist
- Firebase Console में एक Firebase project बनाएँ।
- अपना एंड्रॉइड app project में add करें; google-services.json डाउनलोड करें और app directory में रखें।
- अपनी build.gradle files में Firebase SDK dependencies add करें और sync करें।
- incoming notifications handle करने और FCM token retrieve करने के लिए FirebaseMessagingService implement करें।
- createNotificationChannel API से notification channels बनाएँ (एंड्रॉइड 8.0+, API 26+ के लिए ज़रूरी) और उचित importance levels set करें।
- POST_NOTIFICATIONS permission को अपने manifest में declare करें और runtime पर request करें (एंड्रॉइड 13+, API 33+ के लिए ज़रूरी)।
- अपने app server को configure करें ताकि वह Server Key या service account credentials use करके FCM को messages भेज सके।
- Firebase Console के ज़रिए delivery test करें।
एंड्रॉइड नोटिफ़िकेशन में नया क्या है (2025)
एंड्रॉइड अपने notification model को evolve करता रहता है, यूज़र्स को ज़्यादा control देता है और marketers से ज़्यादा precise होने की demand करता है कि वो किस तरह permission request करते हैं और messages deliver करते हैं।
एंड्रॉइड 13: POST_NOTIFICATIONS permission
एंड्रॉइड 13 (API 33) से शुरू होकर, apps को पुश messages deliver करने से पहले POST_NOTIFICATIONS runtime permission explicitly request करनी होगी। यह permission AndroidManifest.xml में declare करनी होगी और runtime पर request करनी होगी — बिल्कुल camera या location access की तरह।
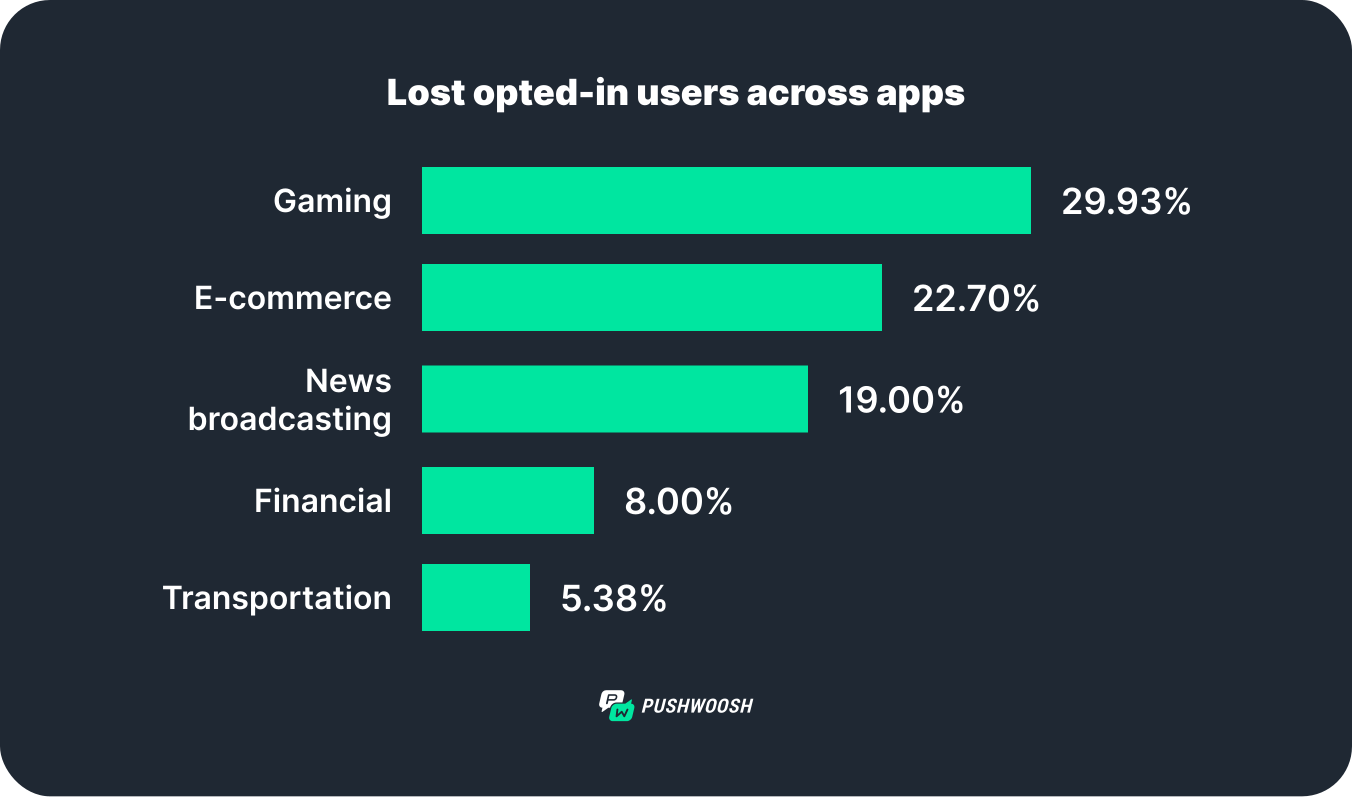
Pushwoosh research के अनुसार, एंड्रॉइड 13 के बाद ज़्यादातर app categories में opt-in rates गिरे। Gaming apps ने अपने opt-in users का लगभग एक-तिहाई हिस्सा खो दिया, जबकि finance और transportation apps में सबसे कम गिरावट देखी गई। गिरावट के बावजूद, average एंड्रॉइड opt-in rate अब भी iOS को outperform करता है।
एंड्रॉइड 14: granular per-channel control
एंड्रॉइड 14 ने यूज़र control को और बढ़ाया। यूज़र्स अब notification preferences को importance level (High, Default, Silent) और notification channel type (Promotions, Reminders, Transactional) के हिसाब से adjust कर सकते हैं। मतलब यूज़र आपकी transactional notifications on रख सकता है जबकि आपके promotional channel को mute कर सकता है — पूरी तरह unsubscribe किए बिना। अपनी channel taxonomy उसी हिसाब से design करें।
एंड्रॉइड 15: notification cooldown
एंड्रॉइड 15 ने Notification Cooldown introduce किया: जब कोई app थोड़े समय में multiple messages भेजता है, एंड्रॉइड लगभग 1–2 minutes के लिए धीरे-धीरे notification volume और vibration intensity कम करता है और फिर restore करता है। इससे burst-sending counterproductive हो जाती है — अब per-user timing automation ही correct approach है।
एंड्रॉइड 15 ने cross-device notification sync भी added किया: यूज़र्स smartphones, tablets, और ChromeOS devices पर वही notifications देखते हैं।
एंड्रॉइड 16: Live Updates API
एंड्रॉइड 16 ने Live Updates API introduce किया — real-time progress tracking के लिए एक persistent notification format (delivery status, ride progress, order countdown)। यह iOS की Live Activities के comparable है और logistics, food delivery, और ride-hailing apps के लिए ideal है।
एंड्रॉइड पर पुश नोटिफ़िकेशन कैसे on या off करें
यह section related searches और People Also Ask में सबसे common end-user question का जवाब देता है: “मैं एंड्रॉइड पर पुश नोटिफ़िकेशन कैसे on करूँ?”
एंड्रॉइड पर पुश नोटिफ़िकेशन कैसे enable करें (एंड्रॉइड 13+)
- अपने एंड्रॉइड device पर Settings app खोलें।
- Apps पर tap करें (या Samsung पर App Management / कुछ OEMs पर App Info)।
- वह app select करें जिसे आप manage करना चाहते हैं।
- Notifications पर tap करें।
- Allow notifications को ON पर toggle करें।
- Optional: हर type को अलग-अलग control करने के लिए individual notification channels (जैसे Promotions, Reminders) पर tap करें।
एंड्रॉइड पर पुश नोटिफ़िकेशन कैसे turn off करें
- Settings खोलें और Apps में जाएँ।
- App select करें।
- Notifications पर tap करें।
- उस app से सभी notifications disable करने के लिए Allow notifications को OFF पर toggle करें, या specific types mute करने के लिए individual channels off करें।
Samsung One UI (Galaxy devices)
Settings > Notifications > App notifications > app select करें > on या off toggle करें। One UI 6+ पर, आप उसी screen से per-app notification categories भी manage कर सकते हैं।
Xiaomi MIUI / HyperOS
Settings > Notifications & Control Center > App notifications > app select करें। ज़रूरी: Xiaomi का Auto-start management permission मिले होने पर भी notifications block कर सकता है। अपने app के लिए Auto-start enable करें Settings > Apps > Manage apps > [App name] > Autostart के तहत।
Huawei (EMUI / HarmonyOS)
Settings > Notifications > app select करें > Allow notifications toggle करें। नोट: Huawei devices Google Play Services के बिना ship होते हैं। अगर आपका app Huawei ecosystem को target करता है, तो push delivery के लिए FCM के साथ-साथ Huawei Mobile Services (HMS) Push Kit से integration ज़रूरी है।
एंड्रॉइड पुश नोटिफ़िकेशन की बेस्ट प्रैक्टिसेज़
सही moment पर opt-in माँगें और value समझाएँ
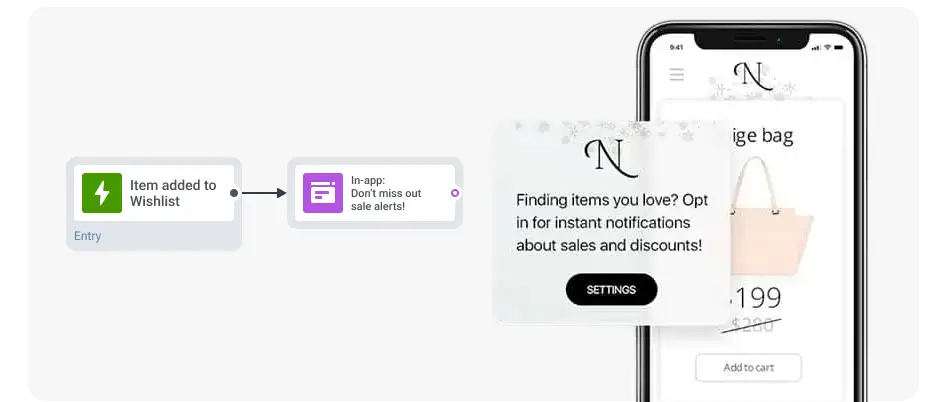
POST_NOTIFICATIONS permission prompt install के तुरंत बाद न दिखाएँ। किसी meaningful user action के बाद permission request करें — onboarding पूरा करना, product देखना, game level finish करना — और एक in-app priming screen दिखाएँ जो explain करे कि यूज़र किस तरह की notifications पाएगा और वो valuable क्यों हैं। यह approach consistently opt-in rates को improve करती है।
relevance को priority दें और हर message को personalize करें
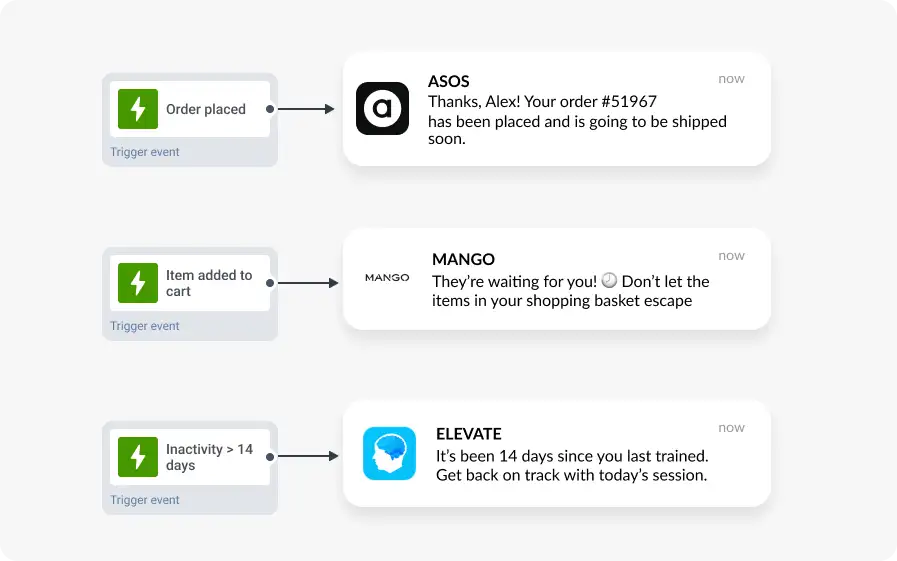
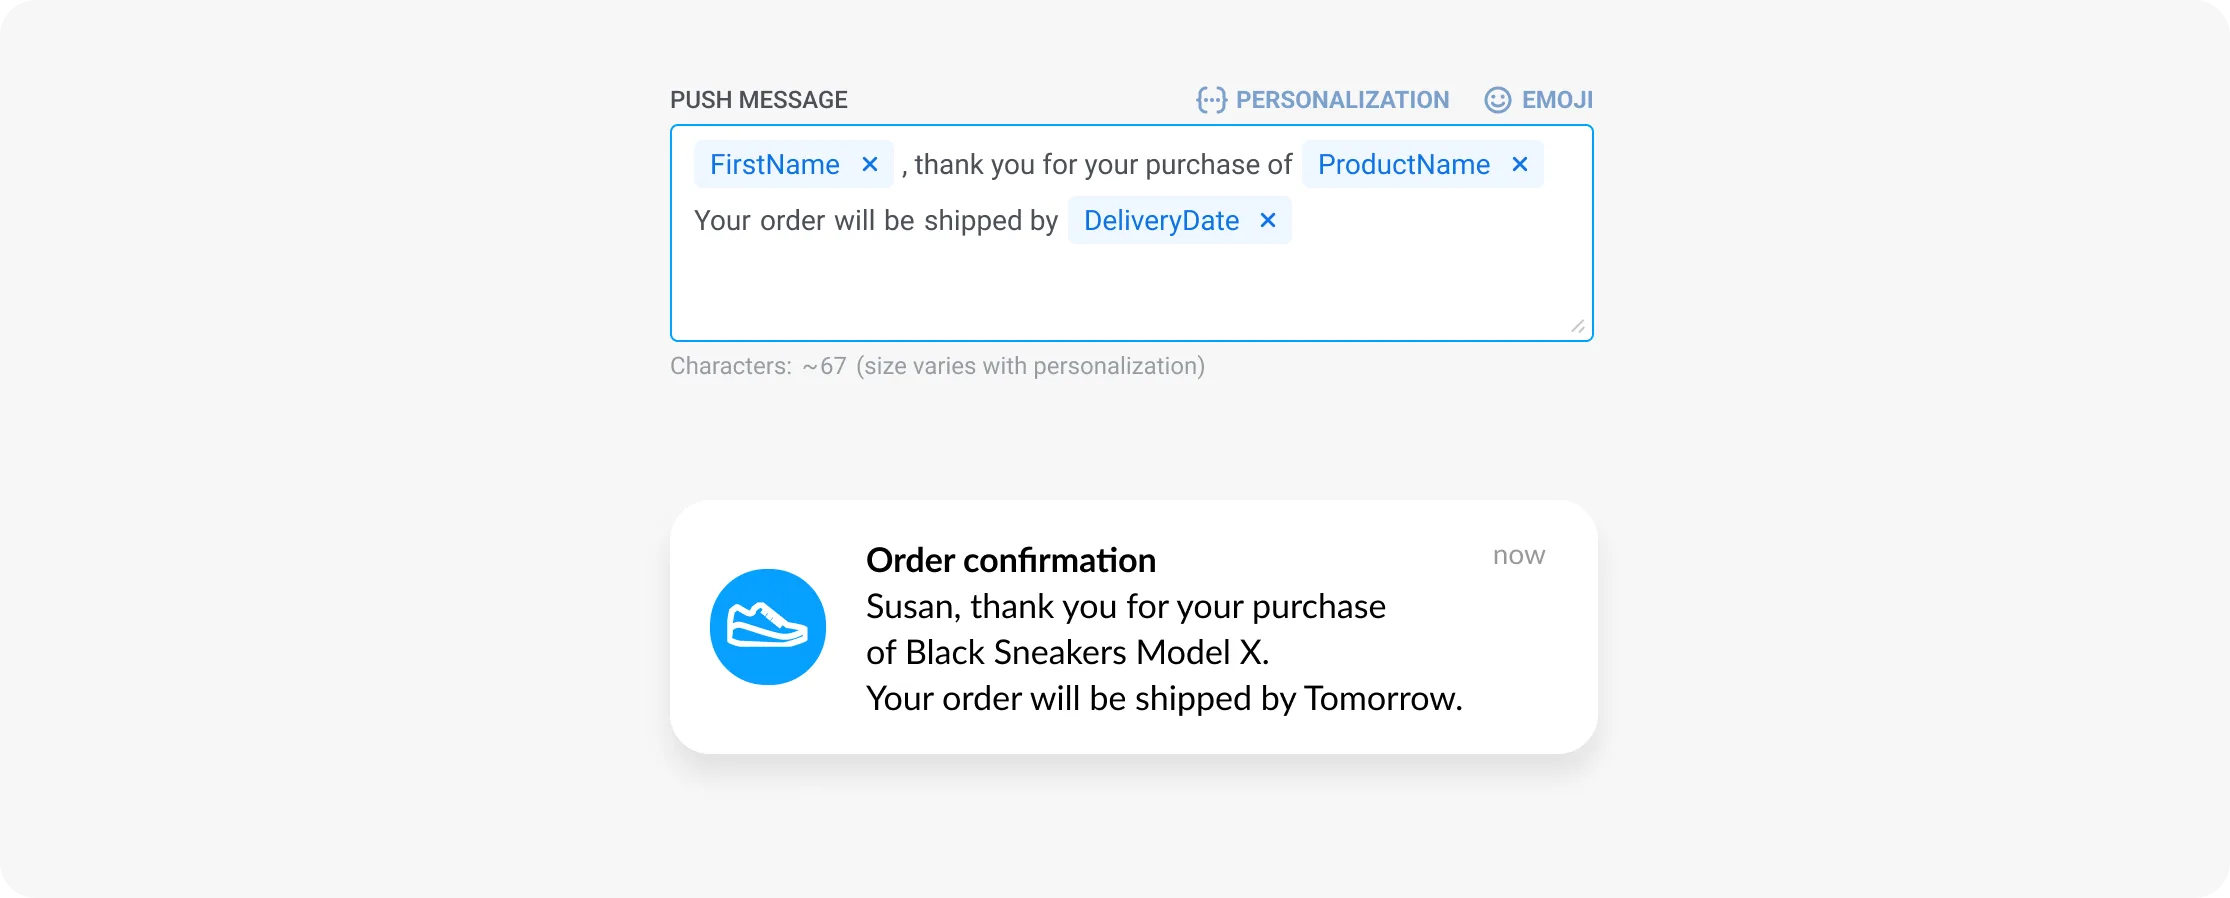
contextually relevant messages भेजने के लिए event-based triggers use करें: “Added to cart”, “Order placed”, “App inactivity > 14 days”। यूज़र का name, product, या location automatically insert करने के लिए triggers को dynamic content के साथ combine करें। Personalized messages CTR और retention impact दोनों में generic broadcasts को consistently outperform करते हैं।
सही time पर delivery automate करें
अपने पूरे user base को single-blast sends से बचें। per-user timing automation use करें: nighttime delivery रोकने के लिए silence periods set करें, और हर message को individual user की peak activity window पर deliver करने के लिए Pushwoosh के Best Time to Send feature का use करें। ठीक से timed campaigns 50% तक higher open rates देखते हैं।
Notification channels को intentionally design करें
clear names के साथ 3–5 distinct notification channels बनाएँ (Promotions, Order Updates, Reminders)। IMPORTANCE_HIGH सिर्फ़ genuinely time-sensitive notifications के लिए set करें — transactional alerts, security codes, live order tracking। Promotional content के लिए IMPORTANCE_DEFAULT use करें। Channels को mis-categorize करना यूज़र्स को उन्हें silence करने की training देता है।
A/B test करें और measure करें
title copy, body text, CTA buttons, send time, और rich media पर A/B tests चलाएँ। opt-in rate, opt-out rate, CTR, और downstream conversions track करें। notification copy और timing में छोटे optimizations समय के साथ significant performance differences में compound होते हैं।
एंड्रॉइड पुश नोटिफ़िकेशन design essentials
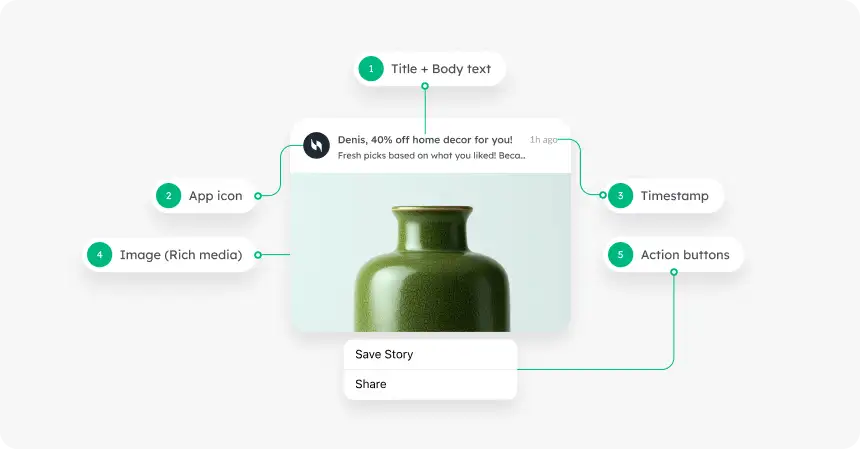
| Element | Recommendation |
|---|---|
| Title | 25–50 characters; keyword शुरुआत में |
| Body text | 150 characters तक; पहले 40 सबसे ज़्यादा visible |
| Rich image | JPEG या PNG, 10 MB तक; 2:1 ratio recommended |
| GIF / video | GIF 10 MB तक, MP4 50 MB तक |
| Action buttons | 3 तक; प्रति button 1–2 words; target devices पर test करें |
| Notification icon | transparent background पर white; 24x24 dp |
एंड्रॉइड iOS से ज़्यादा creative flexibility allow करता है — larger images, ज़्यादा action buttons, और expandable layouts। इसका फ़ायदा उठाएँ, लेकिन हमेशा अलग-अलग OEM skins (Samsung, Xiaomi, Huawei) पर real devices पर test करें जहाँ rendering vary कर सकती है।
Troubleshooting: एंड्रॉइड पुश नोटिफ़िकेशन क्यों deliver नहीं हो रहे
अगर आपके पुश नोटिफ़िकेशन यूज़र्स तक नहीं पहुँच रहे, तो निम्न में से एक कारण most likely है। यह section एंड्रॉइड पर delivery failure के सबसे common कारण cover करता है — permission issues से लेकर OEM-specific battery killers तक।
1. POST_NOTIFICATIONS permission नहीं दी गई
एंड्रॉइड 13+ से, यूज़र्स को POST_NOTIFICATIONS permission explicitly approve करनी होती है। अगर यूज़र ने prompt deny किया या कभी देखा नहीं, तो app notifications deliver नहीं कर सकता। अपना opt-in flow check करें: सुनिश्चित करें कि आप permission request कर रहे हैं और denied state को re-engagement prompt के साथ handle कर रहे हैं जो यूज़र को Settings > Apps > [Your app] > Notifications पर direct करे।
2. Doze mode और App Standby
एंड्रॉइड का Doze mode background processes को restrict करता है — push delivery सहित — जब device लंबे समय तक idle रहा हो। Doze mode में, FCM messages अगले maintenance window तक defer होते हैं। time-sensitive notifications के लिए, FCM high-priority messages (payload में priority: high) use करें, जो Doze को bypass कर सकते हैं। High priority sparingly use करें — एंड्रॉइड उन apps को downgrade करता है जो इसका abuse करते हैं।
3. Battery optimization (OEM-specific killers)
यह Samsung, Xiaomi, और Huawei devices पर missed pushes का सबसे common कारण है। ये manufacturers aggressive battery optimization layers add करते हैं जो Doze settings की परवाह किए बिना background processes को kill कर देते हैं:
- Samsung One UI: Settings > Battery > Background usage limits > Sleeping apps। ensure करें कि आपका app listed नहीं है।
- Xiaomi MIUI / HyperOS: Settings > Apps > Manage apps > [App] > Battery saver, No restrictions पर set करें। Auto-start भी enable करें।
- Huawei EMUI: Settings > Battery > App launch > [App], Manage automatically off करें और Run in background enable करें।
ख़ास तौर पर इन devices पर first launch के समय एक in-app prompt add करने पर consider करें जो यूज़र्स को आपके app के लिए background activity enable करने में guide करे।
4. Notification channel deleted या importance IMPORTANCE_NONE पर set
अगर कोई notification channel delete हो गया है या यूज़र ने उसकी importance none पर set कर दी है, तो उस channel पर भेजे गए सभी messages silently drop हो जाते हैं। अपनी channel configuration audit करें और deletion के बाद कभी same ID से channel re-create न करें — एंड्रॉइड यूज़र की previous choice cache करता है। उसके बजाय एक नई ID के साथ नया channel बनाएँ।
5. FCM token expired या refresh नहीं हुआ
FCM tokens expire हो सकते हैं, यूज़र के app reinstall करने पर rotate हो सकते हैं, या factory reset के बाद invalid हो सकते हैं। अगर आपका app server stale token रखे हुए है, तो FCM UNREGISTERED या INVALID_REGISTRATION error return करेगा। refreshed tokens capture करने और उन्हें automatically अपने backend में sync करने के लिए अपने FirebaseMessagingService में onNewToken callback implement करें।
6. Incorrect notification channel configuration
device पर मौजूद नहीं चैनल पर भेजे गए notifications silently drop हो जाते हैं (एंड्रॉइड 8+)। सुनिश्चित करें कि कोई भी notification भेजने से पहले createNotificationChannel call हो — आम तौर पर Application.onCreate() में। verify करें कि channel IDs आपके notification payload और channel creation code दोनों में exactly match करते हैं।
7. Google Play Services के बिना HMS / Huawei devices
2020 के बाद launch हुए Huawei devices trade restrictions की वजह से Google Play Services के बिना ship होते हैं। इन devices पर FCM काम नहीं करता। Huawei users तक पहुँचने के लिए, Huawei Mobile Services (HMS) Push Kit के साथ integrate करें। Pushwoosh HMS delivery को natively support करता है।
एंड्रॉइड पुश नोटिफ़िकेशन benchmarks (2025)
major industries में 600+ apps के Pushwoosh data पर आधारित:
| उद्योग | Opt-in rate | CTR |
|---|---|---|
| ई-कॉमर्स और रिटेल | 75.28% | 3.78% |
| फिनटेक | 83.85% | 2.84% |
| एक्शन गेम्स | 74.68% | 0.82% |
| हाइपरकैज़ुअल गेम्स | 69.03% | 1.05% |
| मीडिया और मनोरंजन | 76.68% | 1.69% |
| समाचार | 68.00% | 2.63% |
| सभी उद्योगों का औसत | 75.24% | 2.75% |
Pushwoosh — एंड्रॉइड पुश नोटिफ़िकेशन platform
एंड्रॉइड push performance improve करना ज़्यादा messages भेजने के बारे में नहीं है। यह precise targeting, सही timing, और technical reliability के बारे में है जो ensure करे कि messages सच में पहुँचें। Pushwoosh infrastructure handle करता है ताकि आपकी team strategy पर focus कर सके।
- Omnichannel: एंड्रॉइड और iOS push, web push, email, SMS, WhatsApp — एक ही platform से।
- FCM + HMS support: Google Play और Huawei devices दोनों का full coverage।
- No-code Journey Builder: बिना engineering support के automated, behavior-triggered notification flows बनाएँ।
- Advanced segmentation: behavior, RFM parameters, tags, या device type के हिसाब से target करें।
- Best time to send: 50% तक higher open rates के लिए per-user timing optimization।
- ManyMoney AI: autonomous AI जो ready-to-buy यूज़र्स को find करता है और 24/7 revenue के लिए campaigns optimize करता है।